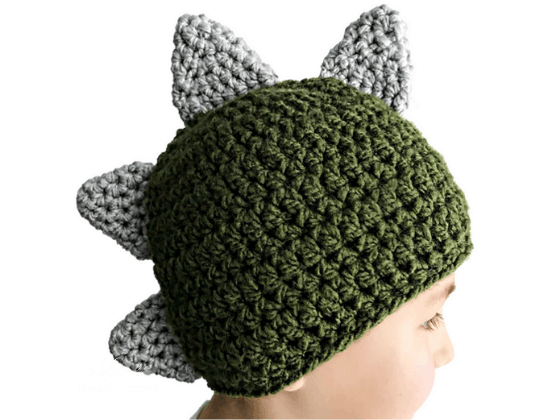
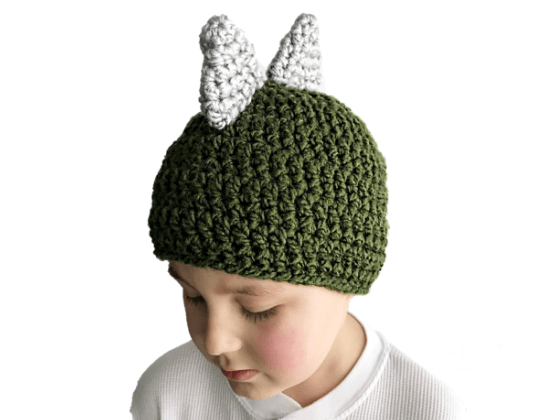
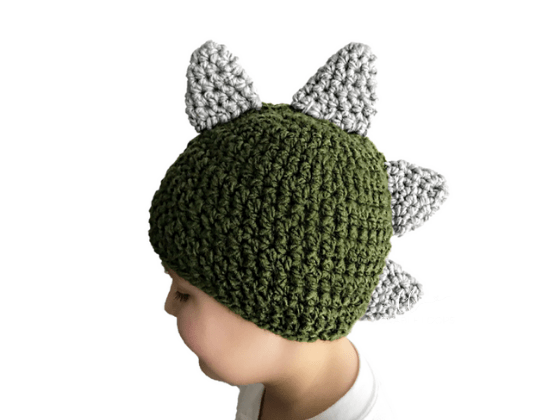
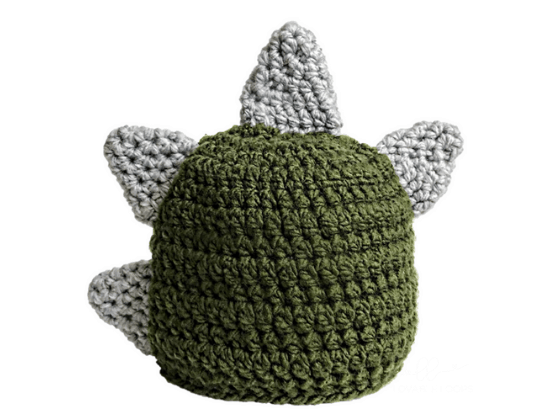
My youngest, Mark, LOVES dinosaurs so I just had to design a dinosaur hat for him. I decided to keep it simple and make a crochet dinosaur spike hat.
This crochet hat is simple, easy to make and works up very quickly. It is a great crochet project for crochet beginners. Enjoy!
Looking for more animal hat patterns? Scroll to the end of this post where I link to my Sloth Hat, Porg Hat, Narwhal Hat, Seal Hat, Deer Hat, Goat Hat, Turkey Hat, Owl Hat, Bear Hat, Moose Hat, Llama Hat, & Penguin Hat
Tag me on Instagram (@lovable_loops) or Facebook to share your pictures.
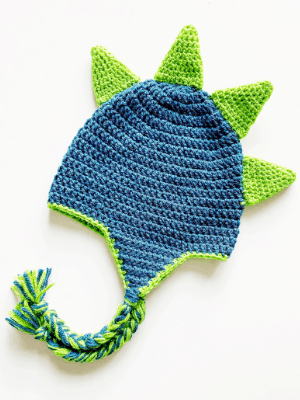
I also have a Dinosaur Spike Hat that is made using worsted weight yarn.
– L 8mm Size Crochet Hooks– (for working with thick yarns)
– Tapestry Needles
– Stitch Markers
– Small Scissors
– Bulky Weight Yarn in green & gray
Toddler, Child & Adult
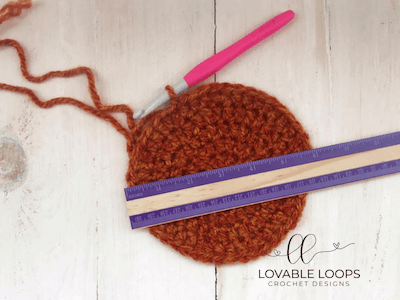
10 dc= 4 inches
4 rows= 2.5 inches
- You are crocheting in the round from the top down.
- The chain 2 at the beginning of each round does not count as a double crochet.
- You can make any size hat longer or shorter by repeating or eliminating the second to last row.
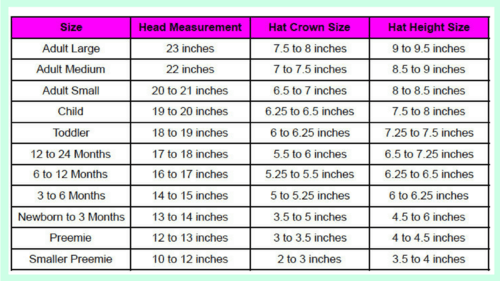
This is the hat size guide that I use to design my hats. This guide was made by Jeanne Steinhilber for The Crochet Crowd. You can read the original post here.
Crochet hook: L 8 mm
Yarn: green
Size Chart Recommendations
Crown: 6 to 6.25 inches
My Sizing
Crown: just under 6 inches
Instructions between two asterisks should be repeated for the remainder of the round.
Rnd 1: magic ring, ch 2, 9 dc, join with sl st in top of first dc [9]
Rnd 2: ch 2, 2 dc in same st, 2 dc in each rem st, join [18]
Rnd 3: ch 2, 2 dc in same st, dc in next st, *2 dc in next st, dc in next st*, join [27]
Rnd 4: ch 2, 2 dc in same st, dc in next 2 sts, *2 dc in next st, dc in next 2 sts*, join [36]
Rnd 5: ch 2, 2 dc in same st, dc in next 3 sts, *2 dc in next st, dc in next 3 sts*, join [45]
Rnds 6-13: ch 2, dc in same st, dc in each rem st, join [45]
Rnd 14: ch 1, sc in same st, sc in each rem st, join, fasten off and weave in ends [45]
Crochet hook: L 8 mm
Yarn: green
Size Chart Recommendations
Crown: 6.25 to 6.5 inches
My Sizing
Crown: just under 6.5 inches
Instructions between two asterisks should be repeated for the remainder of the round.
Rnd 1: magic ring, ch 2, 9 dc, join with sl st in top of first dc [9]
Rnd 2: ch 2, 2 dc in same st, 2 dc in each rem st, join [18]
Rnd 3: ch 2, 2 dc in same st, dc in next st, *2 dc in next st, dc in next st*, join [27]
Rnd 4: ch 2, 2 dc in same st, dc in next 2 sts, *2 dc in next st, dc in next 2 sts*, join [36]
Rnd 5: ch 2, 2 dc in same st, dc in next 3 sts, *2 dc in next st, dc in next 3 sts*, join [45]
Rnd 6: ch 2, 2 dc in same st, dc in next 8 sts, *2 dc in next st, dc in next 8 sts*, join [50]
Rnds 7-14: ch 2, dc in same st, dc in each rem st, join [50]
Rnd 15: ch 1, sc in same st, sc in each rem st, join, fasten off and weave in ends [50]
Crochet hook: L 8 mm
Yarn: green
Size Chart Recommendations
Crown: 7 to 7.5 inches
My Sizing
Crown: just under 7.5 inches
Instructions between two asterisks should be repeated for the remainder of the round.
Rnd 1: magic ring, ch 2, 9 dc, join with sl st in top of first dc [9]
Rnd 2: ch 2, 2 dc in same st, 2 dc in each rem st, join [18]
Rnd 3: ch 2, 2 dc in same st, dc in next st, *2 dc in next st, dc in next st*, join [27]
Rnd 4: ch 2, 2 dc in same st, dc in next 2 sts, *2 dc in next st, dc in next 2 sts*, join [36]
Rnd 5: ch 2, 2 dc in same st, dc in next 3 sts, *2 dc in next st, dc in next 3 sts*, join [45]
Rnd 6: ch 2, 2 dc in same st, dc in next 8 sts, *2 dc in next st, dc in next 8 sts*, join [50]
Rnd 7: ch 2, 2 dc in same st, dc in next 9 sts, *2 dc in next st, dc in next 9 sts*, join [55]
Rnds 8–15: ch 2, dc in same st, dc in each rem st, join [55]
Rnd 16: ch 1, sc in same st, sc in each rem st, join, fasten off and weave in ends [55]

Make 4
Crochet hook: L 8 mm
Yarn: gray
Note: I stopped after round 5 for three of the spikes and stopped after round 6 for the spike that gets sewn directly on top of the head.
Rnd 1: magic circle, ch 2, 6 hdc, join to top of first hdc (rnd 1 count= 6)
Rnd 2: ch 2, 2 hdc in same st, hdc in next 2 sts, 2 hdc in next st, hdc in next 2 sts, join [rnd 2 count= 8]
Rnd 3: ch 2, 2 hdc in same st, hdc in next 3 sts, 2 hdc in next st, hdc in next 3 sts, join [rnd 3 count= 10]
Rnd 4: ch 2, 2 hdc in same st, hdc in next 4 sts, 2 hdc in next st, hdc in next 4 sts, join [rnd 4 count= 12]
Rnd 5: ch 2, 2 hdc in same st, hdc in next 5 sts, 2 hdc in next st, hdc in next 5 sts, join [rnd 5 count= 14]
Rnd 6: ch 2, 2 hdc in same st, hdc in next 6 sts, 2 hdc in next st, hdc in next 6 sts, join and fasten off leaving a long tail for sewing onto hat [rnd 6 count= 16]
Flatten each spike into a triangle shape. You will attach each spike to the hat by sewing the yarn tail through both sides of the spike and around the stitches on the hat.

-Use stitch markers to keep the line of spikes straight.
-Attach the spike that goes directly on top of the head first. It makes it easier to space out the remaining spikes.
-Sew two more onto the back of the head and one onto the front.
Tag me on Instagram (@lovable_loops) or Facebook to share your pictures.