
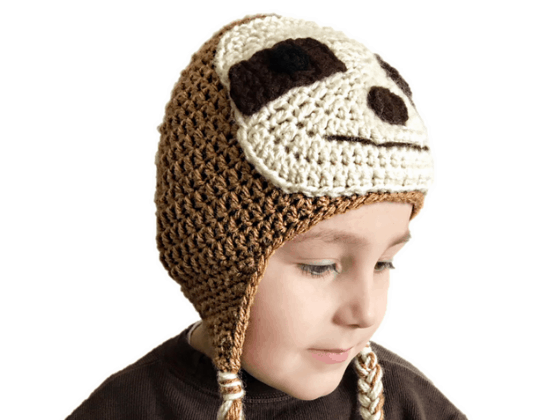

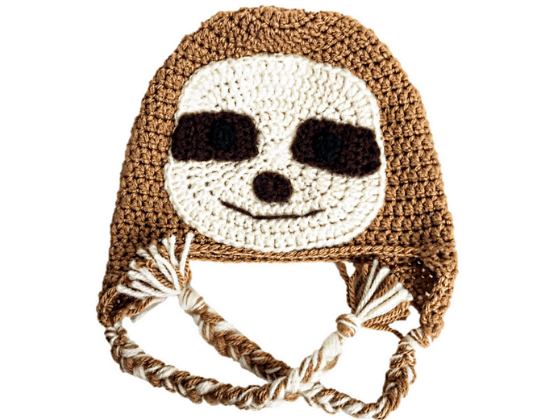
I think sloths are such adorable animals! I’ve been seeing cartoon versions of them everywhere lately. These cute creatures are known for their slowness, but did you know they are nocturnal and spend most of their lives hanging upside down in trees? I loved designing the crochet sloth hat free pattern, and I hope that you enjoy working with it.
Updated Basic Beanie Hat Design
I recently decided to revisit my basic beanie/hat pattern, which I use as the foundation for all of my crochet animal hats patterns.
After designing my Candy Corn and Scarecrow hats using an I 5.5mm crochet hook, I found that I really liked the size and closeness of the stitches.
Therefore, the crochet sloth hat free pattern and many of my other animal crochet hat patterns use this new and improved hat design!
Animal Hats Crochet Patterns
If you like my crochet sloth hat free pattern, then you might also like my other animal hats. Find my other animals hats crochet patterns here. For example, you might also like the crochet goat hat, crochet deer hat and crochet moose hat patterns.
- H & J Size Crochet Hooks- or hook needed to obtain gauge
- Tapestry Needles
- Stitch Markers
- Scissors
- Worsted Weight Yarn- Brown, Dark brown, Off-white, Black
- Finished Sizes: 0/3m, 3/6m, 6/12m, toddler, child, adult
- You are crocheting in the round (hat).
- The ch 2 at the beginning of each round does not count as a dc.
- You can make any size hat longer or shorter by repeating or eliminating the last row before you begin the earflaps.
Crochet gauge: 15 dc= 4”, 7 rows= 3″
If you find that your gauge is too large, use an I 5.5 mm crochet hook.
If you would like me to walk you through the first four rounds of my hat or if you need help with making a magic ring or any of the stitches, visit my channel.

J 6mm hook & brown yarn
Instructions between two asterisks should be repeated for the remainder of the round.
Rnd 1: magic ring, ch 2, 12 dc, join with sl st in top of first dc [rnd 1 count= 12]
Rnd 2: ch 2, 2 dc in same st, 2 dc in each rem st, join [rnd 2 count= 24]
Rnd 3: ch 2, 2 dc in same st, dc in next st, *2 dc in next st, dc in next st*, join [rnd 3 count= 36]
Rnd 4: ch 2, 2 dc in same st, dc in next 2 sts, *dc in next st, dc in next 2 sts*, join [rnd 4 count= 48]
Rnds 5– 13: ch 2, dc in same st, dc in each rem st, join [rnds 5- 13 count= 48]
Do not finish off. Begin pattern for ear flaps.

J 6mm hook & brown yarn
Instructions between two asterisks should be repeated for the remainder of the round.
Rnd 1: magic ring, ch 2, 12 dc, join with sl st in top of first dc [rnd 1 count= 12]
Rnd 2: ch 2, 2 dc in same st, 2 dc in each rem st, join [rnd 2 count= 24]
Rnd 3: ch 2, 2 dc in same st, dc in next st, *2 dc in next st, dc in next st*, join [rnd 3 count= 36]
Rnd 4: ch 2, 2 dc in same st, dc in next 2 sts, *2 dc in next st, dc in next 2 sts*, join [rnd 4 count=48]
Rnd 5: ch 2, 2 dc in same st, dc in next 11 sts, *2 dc in next st, dc in next 11 sts*, join [rnd 5 count=52]
Rnds 6– 15: ch 2, dc in same st, dc in each rem st, join [rnds 6– 16 count= 52]
Do not finish off. Begin pattern for ear flaps.

J 6mm hook & brown yarn
Instructions between two asterisks should be repeated for the remainder of the round.
Rnd 1: magic ring, ch 2, 12 dc, join with sl st in top of first dc [rnd 1 count= 12]
Rnd 2: ch 2, 2 dc in same st, 2 dc in each rem st, join [rnd 2 count= 24]
Rnd 3: ch 2, 2 dc in same st, dc in next st, *2 dc in next st, dc in next st*, join [rnd 3 count= 36]
Rnd 4: ch 2, 2 dc in same st, dc in next 2 sts, *2 dc in next st, dc in next 2 sts*, join [rnd 4 count= 48]
Rnd 5: ch 2, 2 dc in same st, dc in next 11 sts, *2 dc in next st, dc in next 11 sts*, join [rnd 5 count= 52]
Rnd 6: ch 2, 2 dc in same st, dc in next 12 sts, *2 dc in next st, dc in next 12 sts*, join [rnd 6 count= 56]
Rnds 7– 17: ch 2, dc in same st, dc in each rem st, join [rnds 7– 17 count= 56]
Do not finish off. Begin pattern for ear flaps.
J 6mm hook & brown yarn
Instructions between two asterisks should be repeated for the remainder of the round.
Rnd 1: magic ring, ch 2, 12 dc, join with sl st in top of first dc [rnd 1 count= 12]
Rnd 2: ch 2, 2 dc in same st, 2 dc in each rem st, join [rnd 2 count= 24]
Rnd 3: ch 2, 2 dc in same st, dc in next st, *2 dc in next st, dc in next st*, join [rnd 3 count= 36]
Rnd 4: ch 2, 2 dc in same st, dc in next 2 sts, *2 dc in next st, dc in next 2 sts*, join [rnd 4 count= 48]
Rnd 5: ch 2, 2 dc in same st, dc in next 11 sts, *2 dc in next st, dc in next 11 sts*, join [rnd 5 count= 52]
Rnd 6: ch 2, 2 dc in same st, dc in next 12 sts, *2 dc in next st, dc in next 12sts*, join [rnd 6 count= 56]
Rnds 7: ch 2, 2 dc in same st, dc in next 13 sts, *2 dc in next st, dc in next 13sts*, join [rnd 7 count= 60]
Rnds 8– 19: ch 2, dc in same st, dc in each rem st, join [rnds 8- 19 count= 60]
Do not finish off. Begin pattern for ear flaps.
J 6mm hook & brown yarn
Instructions between two asterisks should be repeated for the remainder of the round.
Rnd 1: magic ring, ch 2, 12 dc, join with sl st in top of first dc [rnd 1 count= 12]
Rnd 2: ch 2, 2 dc in same st, 2 dc in each rem st, join [rnd 2 count= 24]
Rnd 3: ch 2, 2 dc in same st, dc in next st, *2 dc in next st, dc in next st*, join [rnd 3 count= 36]
Rnd 4: ch 2, 2 dc in same st, dc in next 2 sts, *2 dc in next st, dc in next 2 sts*, join [rnd 4 count= 48]
Rnd 5: ch 2, 2 dc in same st, dc in next 11 sts, *2 dc in next st, dc in next 11 sts*, join [rnd 5 count= 52]
Rnd 6: ch 2, 2 dc in same st, dc in next 12 sts, *2 dc in next st, dc in next 12sts*, join [rnd 6 count= 56]
Rnds 7: ch 2, 2 dc in same st, dc in next 13 sts, *2 dc in next st, dc in next 13sts*, join [rnd 7 count= 60]
Rnd 8: ch 2, 2 dc in same st, dc in next 14 sts, *2 dc in next st, dc in next 14sts*, join [rnd 8 count= 64]
Rnds 9– 20: ch 2, dc in same st, dc in each rem st, join [rnds 9- 20 count= 64]
Do not finish off. Begin pattern for ear flaps.
J 6mm hook & brown yarn
Instructions between two asterisks should be repeated for the remainder of the round.
Rnd 1: magic ring, ch 2, 12 dc, join with sl st in top of first dc [rnd 1 count= 12]
Rnd 2: ch 2, 2 dc in same st, 2 dc in each rem st, join [rnd 2 count= 24]
Rnd 3: ch 2, 2 dc in same st, dc in next st, *2 dc in next st, dc in next st*, join [rnd 3 count= 36]
Rnd 4: ch 2, 2 dc in same st, dc in next 2 sts, *2 dc in next st, dc in next 2 sts*, join [rnd 4 count= 48]
Rnd 5: ch 2, 2 dc in same st, dc in next 11 sts, *2 dc in next st, dc in next 11 sts*, join [rnd 5 count= 52]
Rnd 6: ch 2, 2 dc in same st, dc in next 12 sts, *2 dc in next st, dc in next 12sts*, join [rnd 6 count= 56]
Rnd 7: ch 2, 2 dc in same st, dc in next 13 sts, *2 dc in next st, dc in next 13sts*, join [rnd 7 count= 60]
Rnd 8: ch 2, 2 dc in same st, dc in next 14 sts, *2 dc in next st, dc in next 14sts*, join [rnd 8 count= 64]
Rnd 9: ch 2, 2 dc in same st, dc in next 15 sts, *2 dc in next st, dc in next 15sts*, join [rnd 9 count= 68]
Rnds 10– 21: ch 2, dc in same st, dc in each rem st, join [rnds 10– 21 count= 68]
Do not finish off. Begin pattern for ear flaps.

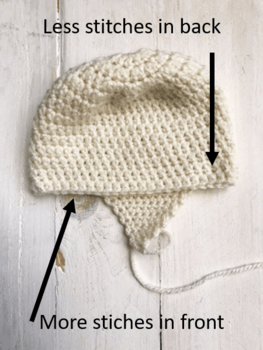
Begin first ear-flap where hat ended. See photo for second ear-flap placement.
Row 1: sc in 12, ch 1, turn [row 1 count= 12]
Row 2: sc2tog, sc in 8, sc2tog, ch 1, turn [row 2 count= 10]
Row 3: sc in each st, ch 1, turn [row 3 count= 10]
Row 4: sc2tog, sc in 6, sc2tog, ch 1, turn [row 4 count= 8]
Row 5: sc in each st, ch 1, turn [row 5 count= 8]
Row 6: sc2tog, sc in 4, sc2tog, ch 1, turn [row 6 count= 6]
Row 7: sc in each st, ch 1, turn [row 7 count= 6]
Row 8: sc2tog, sc in 2, sc2tog, ch 1, turn [row 8 count= 4]
Row 9: sc in each st, ch 1, turn [row 9 count= 4]
Row 10: sc2tog, sc2tog, ch 1, turn [row 10 count= 2]
Row 11: sc2tog and if this is the first ear-flap, finish off. If this is the second ear-flap, continue to sc around entire hat and ear-flaps.

Begin first ear-flap where hat ended. See photo for second ear-flap placement.
Row 1: sc in 14, ch 1, turn [row 1 count= 14]
Row 2: sc2tog, sc in 10, sc2tog, ch 1, turn [row 2 count= 12]
Row 3: sc in each st, ch 1, turn [row 3 count= 12]
Row 4: sc2tog, sc in 8, sc2tog, ch 1, turn [row 4 count= 10]
Row 5: sc in each st, ch 1, turn [row 5 count= 10]
Row 6: sc2tog, sc in 6, sc2tog, ch 1, turn [row 6 count= 8]
Row 7: sc in each st, ch 1, turn [row 7 count= 8]
Row 8: sc2tog, sc in 4, sc2tog, ch 1, turn [row 8 count= 6]
Row 9: sc in each st, ch 1, turn [row 9 count= 6]
Row 10: sc2tog, sc in 2, sc2tog, ch 1, turn [row 10 count= 4]
Row 11: sc in each st, ch 1, turn [row 11 count= 4]
Row 12: sc2tog, sc2tog, ch 1, turn [row 12 count= 2]
Row 13: sc2tog and if this is the first ear-flap, finish off. If this is the second ear-flap, continue to sc around entire hat and ear-flaps.

Use I 5.5 mm hook & off-white/cream yarn
Instructions between two asterisks should be repeated for the remainder of the round.
Rnd 1: magic ring, dc 10, join with sl st in top of first dc [rnd 1 count= 10]
Rnd 2: ch 2, 2 dc in same st, 2 dc in each rem st, join [rnd 2 count= 20]
Rnd 3: ch 2, 2 dc in same st, dc in next st, *2 dc in next st, dc in next st*, join [rnd 3 count= 30]
Rnd 4: ch 2, 2 dc in same st, dc in next 2 sts, *2 dc in next st, dc in next 2 sts*, join [rnd 4 count= 40]
Rnd 5: ch 2, 2 dc in same st, 2 dc in next st, dc in next 10 sts, 2 dc in next 2 sts, dc in next 6 sts, 2 dc in next 2 sts, dc in next 10 sts, 2 dc in next 2 sts, dc in rem 6 sts, join [rnd 5 count= 48]
——STOP HERE FOR SIZES 0/3m & 3/6m——
Rnd 6: ch 2, 2 dc in same st, 2 dc in next 2 sts, dc in 12 sts, 2 dc in next 3 sts, dc in 6 sts, 2 dc in next 3 sts, dc in 12 sts, 2 dc in next 3 sts, dc in 6 sts, join [rnd 6 count= 60]
——STOP HERE FOR SIZES 6/12m & toddler——
Rnd 7: ch 2, 2 dc in same st, 2 dc in next 3 sts, dc in 14 sts, 2 dc in next 4 sts, dc in 8 sts, 2 dc in next 4 sts, dc in 14 sts, 2 dc in next 4 sts, dc in 8 sts, join, fasten off and leave long tail for sewing [rnd 7 count= 76]
——STOP HERE FOR SIZES child & adult——
Use tapestry needle to sew face onto hat. Make sure it is centered between the ear flaps.
Use H 5mm hook and dark brown yarn
Row 1: ch 6, hdc in 2nd ch from hook, hdc in next 4 chs, ch 2, turn [row 1 count= 5]
Row 2: hdc in each st, ch 2, turn [row 2 count= 5]
Row 3: hdc in each st, ch 2, turn [row 3 count= 5]
Row 4: hdc in each st, ch 2, turn [row 4 count= 5]
Row 5: hdc in each st, ch 2, turn [row 5 count= 5]
——STOP HERE for sizes 0/3 m & 3/6m——
Row 6: hdc in each st, ch 2, turn [row 6 count= 5]
——STOP HERE for sizes 6/12 m & toddler——
Row 7: hdc in each st, finish off and leave long tail for sewing on [row 7 count= 5]
——STOP HERE for sizes child & adult——
Use tapestry needle to sew onto the face. Position the top of the eye to be slightly above the midpoint of the face.
Pupils
Use H hook (5mm) and black yarn
Magic ring, hdc 6, join with sl st in top of first hdc, finish off and leave long tail for sewing on
Use tapestry needle to attach pupils to eyes. Position just slightly closer to middle of face.
Use H hook (5mm) and dark brown yarn
Rnd 1: magic ring, 6 sc, join with sl st in top of first sc [rnd 1 count= 6]
Rnd 2: ch 2, 2 hdc in same st, hdc in next 2 sts, 2 hdc in next st, hdc in rem 2 sts, join, fasten off and leave long tail for sewing onto hat [rnd 2 count= 8]
Use tapestry needle to sew onto face. Position centered between the eyes and 1-2 rows below the middle of the face.
Use a tapestry needle and your dark brown yarn to sew mouth onto hat.
Cut six 30” strands of the brown and off-white/cream yarns (total= 12 strands). Holding all of the strands, fold in half and pass the folded loop through the bottom of the ear flap (use hook to help). Pass the strand ends through the loop and pull tight to form a knot. Divide the strands into three sections (8 strands in each) and braid. Repeat for 2nd braid.


I hope you like my pattern. Please tag me on Instagram lovable_loops if you make your own!